Over time, your prayer plant may outgrow its current pot or start showing signs that it’s ready for a change. Transplanting your prayer plant is the key to unlocking its full potential, ensuring it thrives for years to come.
In this guide, we’ll share how to transplant prayer plant effectively. Whether you’re a seasoned green thumb or just starting your indoor gardening adventure, we’ve got you covered.
Transplanting may seem daunting, but with the right knowledge and a dash of enthusiasm, you can provide your prayer plant with a larger home, better soil, and optimal growing conditions. This act of care and nurturing will reward you with healthier foliage, increased vibrancy, and a plant that truly flourishes in your space.
So, roll up your sleeves, gather your gardening tools, and get ready to give your prayer plant the upgrade it deserves.
Step-by-Step Guide on Prayer Plant Repotting
Transplanting your prayer plant (Maranta leuconeura) is a crucial task to ensure its continued health and vitality as it grows. Here’s a step-by-step guide to help you successfully transplant your prayer plant:
Step 1: Gather Your Materials
New Pot: Choose a pot that is 1-2 inches larger in diameter than the current one and has drainage holes at the bottom.
Potting Mix: Use a well-draining, high-quality potting mix suitable for tropical plants or create your mix by combining potting soil, perlite, and a bit of peat moss.
Pruning Shears or Scissors: For any necessary root or foliage trimming.
Trowel or Spoon: To help with soil and root handling.
Watering Can or Spray Bottle: For watering the plant after transplanting.
Step 2: Choose the Right Time
The best time to transplant your prayer plant is during its active growing season, which typically spans from spring through early summer. Avoid transplanting during the dormant winter months, as the plant’s growth is minimal, and it may be more susceptible to stress.
Step 3: Prepare Your New Pot
Ensure the new pot has drainage holes at the bottom to prevent overwatering.
Add a small layer of fresh potting mix to the bottom of the new pot.
Step 3: Water Your Prayer Plant
Water your prayer plant a day or two before transplanting to hydrate the roots and make removal easier.
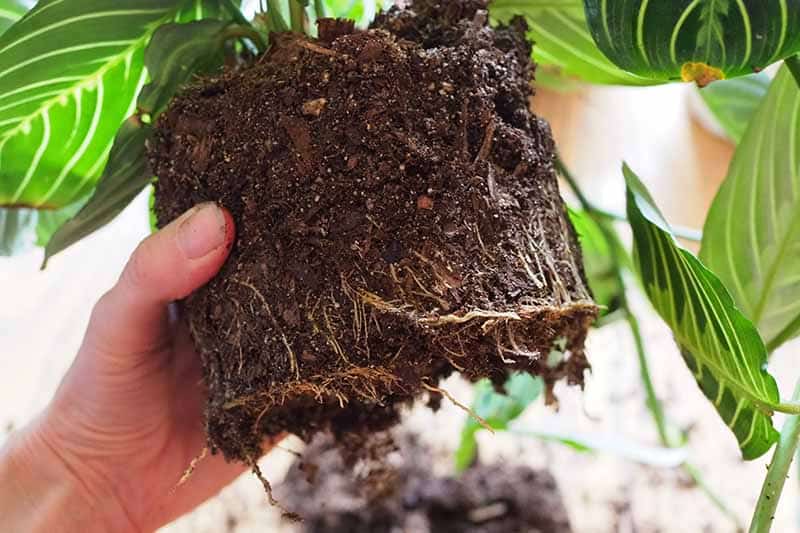
Step 4: Gently Remove the Plant
Carefully remove the plant from its current pot by gently turning it upside down and tapping the bottom. Be cautious not to damage the roots or foliage.
Step 5: Inspect and Trim Roots (If Necessary)
Examine the roots for any signs of rot, damage, or overcrowding. Trim away any unhealthy or excessively long roots with clean pruning shears or scissors.
If the plant is root-bound (roots tightly circling the root ball), gently tease the roots apart to encourage outward growth.
Step 6: Position the Plant in the New Pot
Place the plant in the center of the new pot, ensuring it sits at the same depth as it did in the old pot. Adjust the potting mix beneath the root ball to achieve the desired height.
Step 7: Fill the Pot with Fresh Soil
Fill the remaining space in the new pot with fresh potting mix, gently pressing it down as you go. Leave a small gap at the top to allow for watering.
Step 8: Water Thoroughly
After transplanting, water the plant thoroughly to settle the soil and eliminate air pockets around the roots.
Allow excess water to drain from the bottom of the pot.
Step 9: Prune Foliage (If Needed)
If your prayer plant has become leggy or has damaged or yellowing leaves, consider trimming them to encourage healthier growth.
Read more: Common Reasons And Tips To Prune Prayer Plant
Step 10: Place the Plant in Its Ideal Location
Return the plant to its preferred location, which is typically bright, indirect light for prayer plants.
Avoid exposing the plant to direct sunlight, drafts, or extreme temperature fluctuations.
Step 11: Monitor and Care
Keep a close eye on your newly transplanted prayer plant in the days and weeks following the process. Ensure it’s adjusting well to its new environment.
Resume your regular watering and fertilizing routine, adjusting as needed based on the plant’s response.
Transplanting Tips for Success:
Choose the Right Pot: Ensure the new pot has drainage holes to prevent waterlogged soil, which can lead to root rot.
Use Fresh Potting Mix: Always use fresh potting mix when transplanting to provide your plant with the nutrients it needs for healthy growth.
Handle Roots with Care: Be gentle when handling the plant’s roots to minimize stress and damage.
Water Mindfully: Water the plant immediately after transplanting to help settle the soil and hydrate the roots. Be cautious not to overwater, as this can lead to root rot.
Give It Time: It’s normal for your prayer plant to experience a brief period of adjustment after transplanting. Be patient and continue to provide care and attention.
Avoid Disturbing the Roots: Once you’ve transplanted your prayer plant, try to avoid unnecessary root disturbance by not repotting too frequently.
Know These Signs Your Prayer Plant Will Need To Be Repotted
Transplanting a prayer plant (Maranta leuconeura) is a common practice among plant enthusiasts, and there are several reasons why you might consider repotting or transplanting your prayer plant:
1. Root Bound
Over time, the roots of your prayer plant can become bound within its current pot. This restricts root growth and can lead to the plant becoming root-bound. Transplanting to a larger pot with fresh soil provides more room for root expansion, promoting healthier growth.
2. Outgrown Pot
As your prayer plant matures, it may outgrow its current pot. If you notice that the plant is becoming too large for its container, with roots pushing against the pot’s boundaries, it’s time to transplant it to a larger pot to accommodate its size.
3. Soil Depletion
The potting soil in your prayer plant’s current pot can become depleted of nutrients over time. Transplanting allows you to refresh the soil, ensuring your plant has access to the necessary nutrients for healthy growth.
4. Disease or Pest Infestation
If your prayer plant has been affected by diseases or pests, transplanting can be a method to address the issue. By replacing the soil and removing any affected roots, you can reduce the risk of the problem spreading.
5. Pot Maintenance
Sometimes, pots can become damaged or deteriorate over time. Transplanting provides an opportunity to transfer your prayer plant to a new, undamaged container.
6. Improving Plant Health
If your prayer plant is showing signs of stress, such as yellowing leaves, slow growth, or general decline, transplanting to fresh soil and a clean pot can help alleviate stress and improve overall health.
7. Seasonal Maintenance
Some gardeners choose to transplant their prayer plants as part of their regular plant care routine. Transplanting during the growing season, typically in spring or early summer, can promote optimal growth.
Final Thoughts
Remember that transplanting should be done with care and consideration for the plant’s needs. Choose an appropriate pot size, use well-draining soil, and follow proper transplanting techniques to minimize stress and ensure a successful transition for your prayer plant.