Canna lily is a tropical climate plant, so it loves warm temperatures and high humidity. Currently, however, varieties of canna lily can be grown in temperate areas in many countries around the world.
This plant is a perennial, broad-leaved, iris-like flower that is red, pink, yellow, or white. Canna lilies are easy to grow and care for, so many gardeners love to grow them in pots or the garden.
As you know, canna lily does not tolerate low temperatures, so gardeners often find ways to preserve and freeze their bulbs to replant when temperatures are warm.
How to preserve canna lily throughout the winter? Is overwintering canna lilies in pots the best way? All the answers are available in the article below.
Overwintering Canna Lilies In Pots – Why Do This?
As you know, the canna lily is a plant that loves warm temperatures and does not tolerate low winter temperatures. So canna lily can be dead or damaged when winter comes.
Extreme low temperatures and frost will cause the plant to stop growing and enter a dormant period. Normally, you should transplant a canna lily every 3 years to solve the problem of the number of bulbs in the root system.
Too many bulbs will limit the size and growth of other branches. To get healthy sprouts the next growing season, you can preserve canna lily bulbs and plant them when summer returns.
You don’t need a greenhouse to freeze canna lily bulbs or a complicated system. The preservation of this plant in the winter is quite simple.
You can freeze canna lily in your basement, garage, cellar, or space. Make sure the area is rain-free, dry, and doesn’t freeze in low temperatures. An area that is warm in winter and dry is ideal for storing canna lily.
How To Overwinter Canna Lily In Winter?
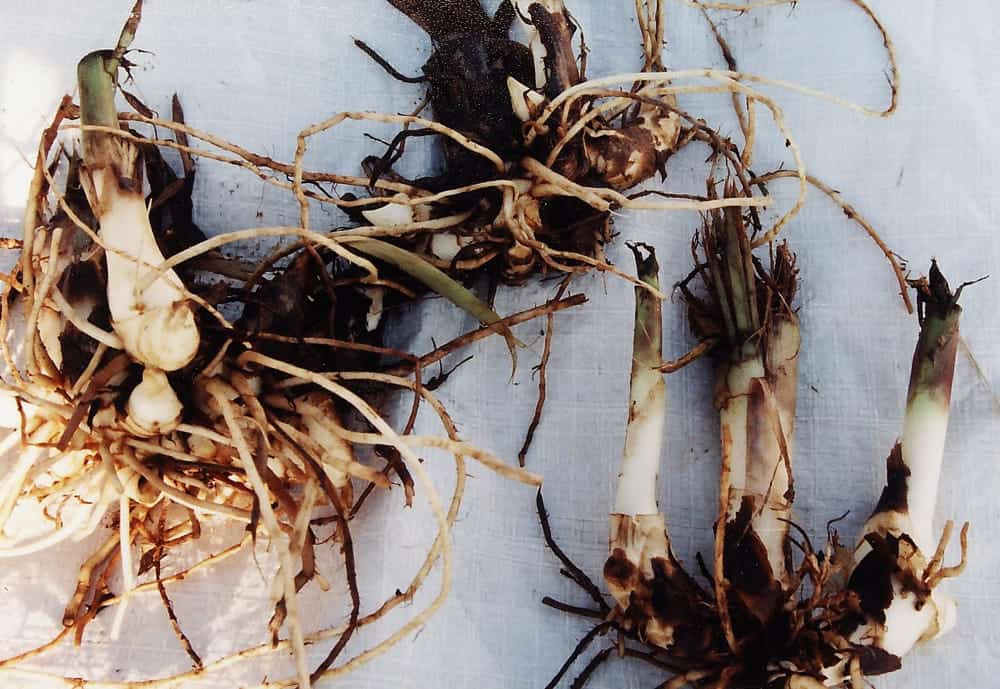
Canna lily is a large root plant with many tubers of different sizes. They are usually about 10 inches above the ground. The roots and sprouts of canna lily are very fragile and damaged, so you need to do this process gently and carefully.
To freeze canna lily bulbs in pots, you need to follow the steps below.
1. Dig the root system of canna lily
You can use tools to dig trees, but you need to clean them before doing so. To facilitate digging up the canna lily’s entire root system, you need to prune the stem and keep it to a height of 6 inches to easily lift the large roots.
You begin to dig slowly and trim away the roots that are too long and deeply embedded in the soil. Avoid damaging the bulbs and young shoots.
If you grow canna lily in a pot or styrofoam container, you can lift the pot upside down and gently tap it to let the roots fall. Don’t get used to holding large roots as they can break if you’re not careful.
2. Pruning the root system
Once you’ve dug all the roots of the canna lily, you can separate them into small clumps. It will make it easy to clean as well as save space in your home.
After digging up the roots of the canna lily, you should let it dry for a few hours. Do not leave them in direct sunlight as the bulbs will easily lose water and wilt. Also, don’t let them freeze as the tubers will spoil and rot.
You don’t need to completely remove the soil on the bulbs, tap to remove some of the excesses. Then let the rest of the soil dry naturally, so it won’t wet the tubers and cause rotting.
3. Freezing canna lily
You need to prepare a pot or styrofoam container containing coal moss, mud, or wood chips. A wooden box will be a better choice than a plastic or styrofoam box because the ability to escape moisture will be better.
You need to lay a layer of peat on the bottom at least 1 inch thick. Then you put the bulbs of canna lily in the barrel and cover with a layer of peat. Don’t put them too close and touch each other because they will rot.
To prevent excessive moisture in the container or pot from causing rotting of the canna lily’s roots, you should not use rubber or plastic caps to seal the container. You should use a vented plastic bag or paperboard to allow moisture to escape easily.
Alternatively, to avoid the roots touching each other, you can use newspaper or paper to wrap around the bulbs. Then you place the barrel in a dark, dry place and the temperature is below 50 degrees F.
If the temperature is higher and warm, the canna lily will grow sooner in the container or rot. During the winter storage period, you need to open the lid of the container to check and prevent the tubers from freezing and rotting after thawing.
Another way you can use it is to let the roots of the canna lily dry on their own. Then you just need to put them in a dry place and remove the sprouts as they come out.
This will inhibit their growth and wait until summer is warm again. However, this only applies when the temperature is cold and dry and the tubers are not frozen, otherwise, they are very susceptible to rotting.
When Can I Grow Canna Lily Again?
When temperatures return to warm in spring, check the canna lily’s root branches to plant them in the ground. Get rid of rotten rhizomes and choose sprouted bulbs to plant.
About 4-5 weeks before the last frost of winter, you can plant canna lily bulbs in small pots with soil and a small amount of fertilizer. This will stimulate the growth of the plants and help them harden before being planted in the ground.
Make sure the potted plants are not exposed to cold winds and freezing during this time. You need to give them warmth every day to stimulate the growth of young leaves. When spring comes back, the young plants are sturdy, you can proceed to plant them in the ground.
Do not forget to give the young plants time to get used to the outside temperature and environment after a period of storage and living in favorable conditions.
Read more: Canna Lily Leaves Turning Brown – Causes And Solutions
The Last Word
Canna lily is a plant that loves warm temperatures and thrives in the summer months. In winter, the plant will stop growing and the roots can be damaged by low temperatures.
Therefore, freezing canna lily root branches is essential in winter. Store the bulbs of this plant gently in the container and check the moisture in the container.
Be sure to place the container in a place that is not freezing, dry, and well-ventilated. Tubers are very susceptible to rotting or spoiling if frozen or in high humidity. Use paper, charcoal, or wood chips to preserve and prevent moisture.